
極致懶:Word 內文批量抓圖 Python 工具
使用這個工具是有前提的,請先詳閱以下說明書

使用這個工具是有前提的,請先詳閱以下說明書
- 此工具專門是抓取「 Word 」文件內的所有圖片檔案。
- 每個圖片的命名,是以緊隨圖片後的第一個段落做命名。(此部分可以延伸參考 使用 Word「插入標號」功能,輕鬆管理圖片編號、產出圖片目錄 此篇文章搭配使用)
- 此工具目前只能確定在 Mac 電腦上可以成功使用。
- 請確定你的電腦已經安裝 python 相關前置設定,以便運行此工具。
以下是這個工具的原始碼,大家可以自行複製取用,方便後續引用說明,程式碼複製儲存時,可以將檔案存為 `python_get_word_image.py` 。
import os
from io import BytesIO
from docx import Document
from PIL import Image

def save_image(image, path):
    """Save the image and ensure the directory exists"""
    folder = os.path.dirname(path)
    if not os.path.exists(folder):
        os.makedirs(folder)
    image.save(path)

def get_caption_after_image(paragraphs, start_index):
    """Get the first line of text after the image as the caption"""
    for i in range(start_index + 1, len(paragraphs)):
        text = paragraphs[i].text.strip()
        if text:
            return text
    return None

def extract_images(doc_path, output_folder):
    """Extract images from the Word document and name them using the first line of text below each image"""
    doc = Document(doc_path)
    i = 1
    processed_images = set()

    # Iterate over all paragraphs to find and extract images
    for para_index, paragraph in enumerate(doc.paragraphs):
        for run in paragraph.runs:
            inline_shapes = run._element.findall(".//{http://schemas.openxmlformats.org/drawingml/2006/main}blip")
            for inline_shape in inline_shapes:
                rId = inline_shape.get("{http://schemas.openxmlformats.org/officeDocument/2006/relationships}embed")
                if rId:
                    rel = doc.part.rels[rId]
                    if rel.target_part.blob not in processed_images:
                        processed_images.add(rel.target_part.blob)
                        image = Image.open(BytesIO(rel.target_part.blob))

                        # Get the first line of text below the image as the caption
                        image_caption = get_caption_after_image(doc.paragraphs, para_index) or f"image_{i}"

                        # Remove illegal characters from the filename
                        image_caption = image_caption.replace(":", "_").replace("/", "_").replace("\\", "_").replace("*", "_").replace("?", "_").replace("\"", "_").replace("<", "_").replace(">", "_").replace("|", "_")

                        # Save the image
                        image_format = image.format.lower()
                        image_path = os.path.join(output_folder, f"{image_caption}.{image_format}")
                        save_image(image, image_path)
                        print(f"Saved image: {image_path}")
                        i += 1

    print("All images have been extracted and renamed!")

# Setting
doc_path = "/Users/sylvia/v2024082101.docx"  # Replace with the path to your Word document
output_folder = "/Users/sylvia/v2024082101"  # Replace with the path to your desired output folder
extract_images(doc_path, output_folder)
這個程式碼唯一要改的地方有兩個,就是倒數第 3 行跟倒數第 2 行。
doc_path:雙引號裡需放入你的 word 文件位置。
output_folder:雙引號裡需要放入你預期輸出的圖片所放置的資料夾位置。
以上都設定好以後就可以命令列輸入如下指令來執行,工具就會開始抓圖。
python /Users/sylvia/python_get_word_image.pyps. 請注意你實際的 python 路徑唷!
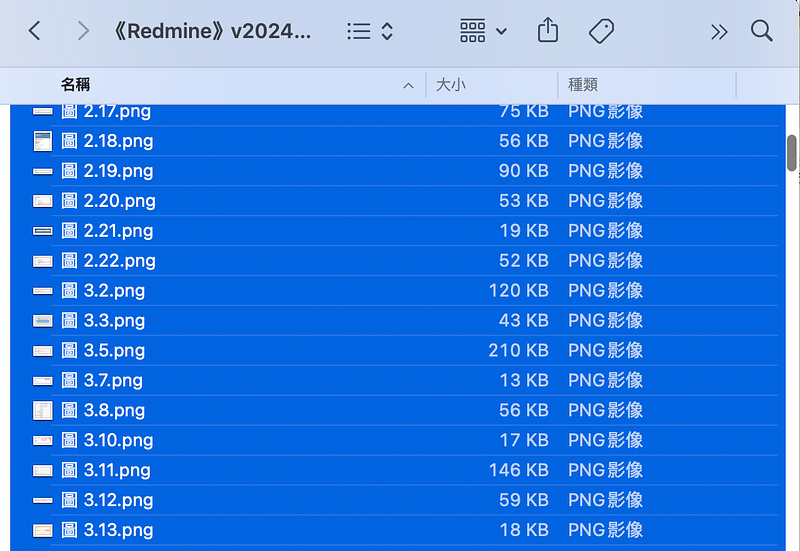
會有這個工具,是因為最終在《Redmine 專案管理無痛攻略:70個問題集 x 專屬教學影片,從入門到精通一本全搞定!》書本的交稿要求才出生的產物,要交付的稿件不是只要 Word 就好,也需要把相關的圖片都另外整理,並且命名需要與 Word 內一致。
我看著我的稿件內的圖片心想,這…我是要抓到天荒地老嗎?這種苦頭我真的不想吃啊啊啊啊啊啊啊 (๑´ㅁ`)
於是就跟我的便宜好用好戰友好密友 ChatGPT 合作產出了這個小工具,以上就提供給有需要的朋朋!